Startin’blox Podcast Tutorial
Presentation and Objectives
Startin’blox provides SOLID components called “blox” to build-up a website or a webapp that can consume and
manage data from various SOLID-compatible sources. This tutorial shows the various front-end blox available
in the framework and describe step-by-step how to use it to make a podcast reader and sharing application.
This application is build as a blox itself and can be embeded in a website by just dropping a
<solid-podcast> tag in the page.
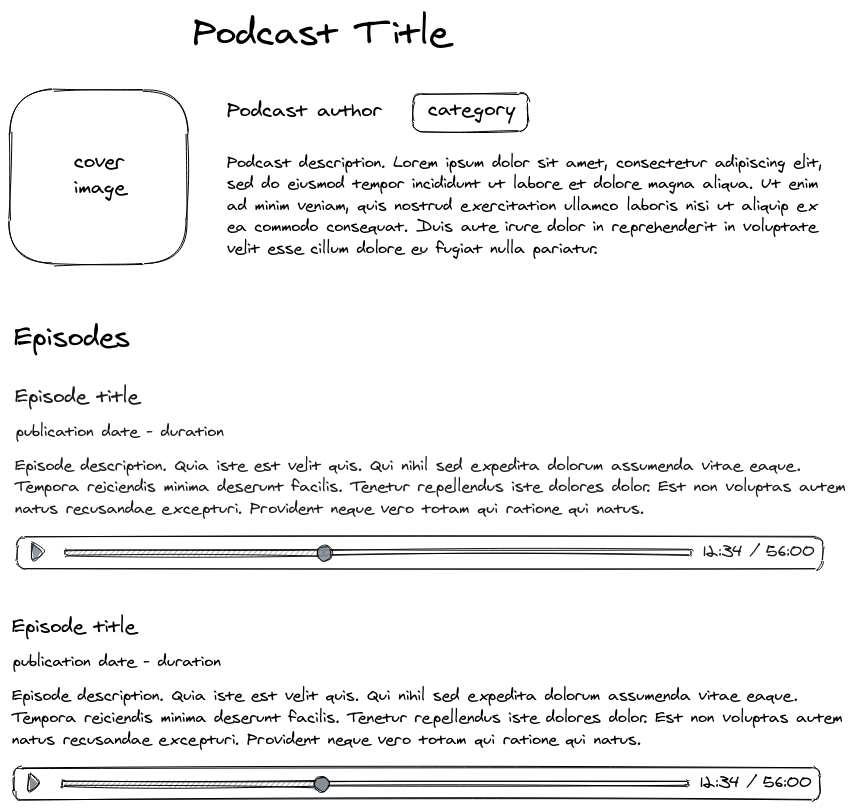
Here is the simple mockup that shows what the component will look like :
In this tutorial, we will use some Radio France podcasts. Feel free to use your own if you like.
Teaching Objectives
Learn what a data source is
Use
solid-displayblox and understand the basic concepts about the consumed dataOrganise the listed items and use widgets to customize the display (fields, field sets, img, …)
Apply css to have your own look-and-feel
Create custom widgets
Plug js to have your own behavior
Semantic data source
Before begining our journey, we need a semantic data source formatted in a way that the framework can understand. The only supported format today in Startin’blox JSON Linked Data (JSON-LD).
But a vast majority of podcast feeds are provided in RSS format. So let’s use a simple conversion tool
that will take a podcast RSS feed and format it to JSON-LD. You can find this little helper called
rss2jsonld on this git repository or use directly the
bundled source from https://cdn.startinblox.com/tuto/rss2jsonld.js.
Setup the environment and display data
To use the Startin’blox framework, just embed it in the head of your html :
<!DOCTYPE html>
<html>
  <head>
      <meta charset="utf-8"/>
      <title>SiB tutorial - Podcast</title>
      <script type="module" src="https://cdn.skypack.dev/@startinblox/core@0.15"></script>
      <script src="https://cdn.startinblox.com/tuto/rss2jsonld.js"></script>
  </head>
  <body>
  </body>
</html>
core is the “heart” of the framework, and contains all the needed parts to get started. The current version
of the core is 0.15.6 at the time of writing. The third number will increase with each published improvement
and bugfix. Using @0.15 at the end of the url will make it point to the latest bugfix available. The second
number 15 will increase when new feature or breaking change are introduced. If you remove the @15 from the
url, your application will get the next release as soon as it is published, but you probably have to change some
part of it to make it work with this new version. So specifying the version is safer.
The rss2jsonld script is here to automatically convert RSS data source to JSON-LD format.
We can now use our first blox : <solid-display>. Startin’blox use the HTML Custom Element specification
which is part of the webcomponents standard, to create those blox. So you can use it as any other HTML tag,
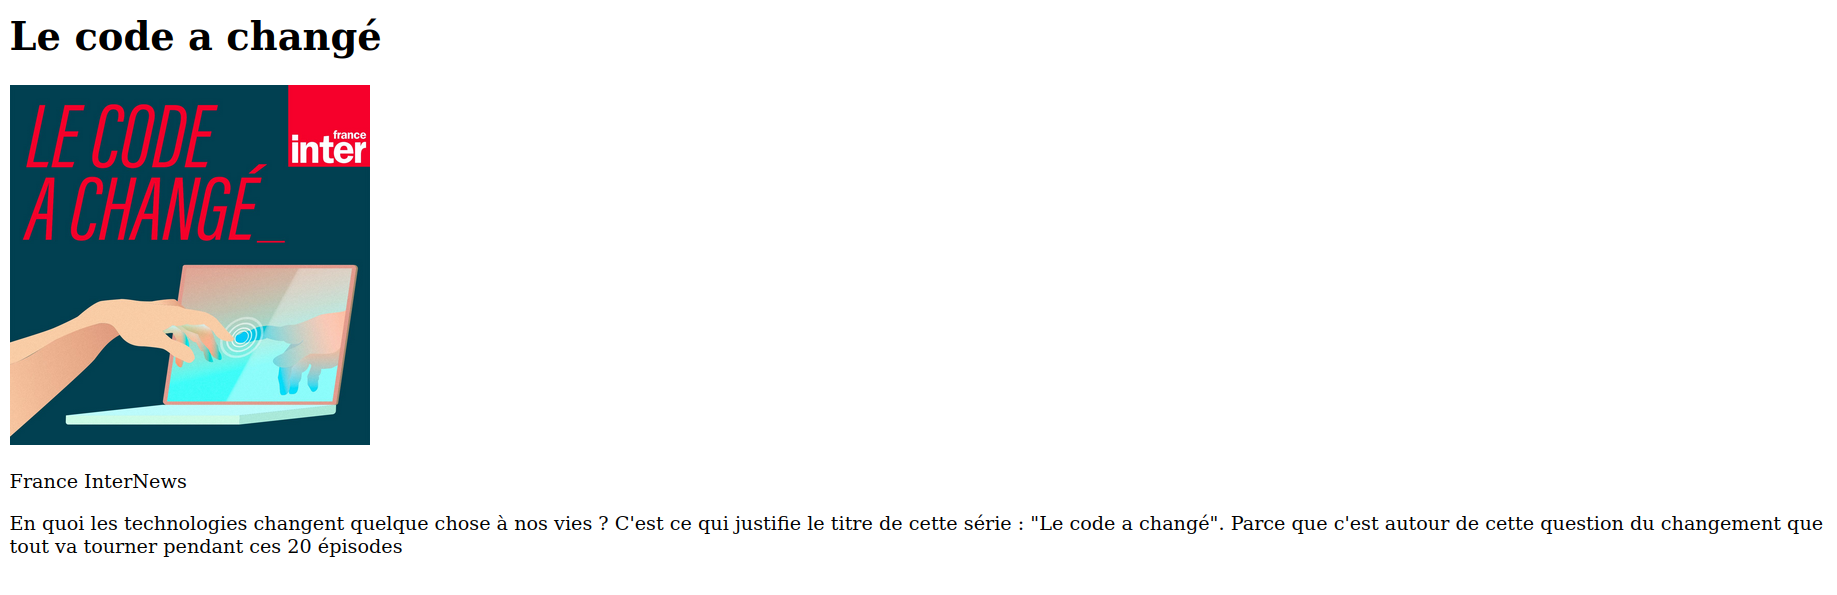
like <video> or <select>. This blox simply displays the data provided by the linked data source :
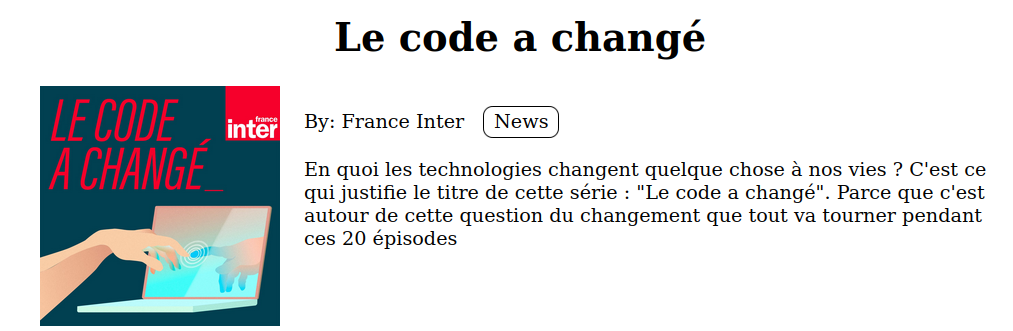
<solid-display data-src="http://radiofrance-podcast.net/podcast09/rss_20856.xml" no-render/>
I use the no-render attribute so that the RSS XML feed is not loaded by startin’blox until it was converted
by rss2jsonld.
The result is not very pretty : all fields are displayed in plain text without formatting :

Organize and format data
To put data in order, we use the fields tag :
<solid-display
  data-src="http://radiofrance-podcast.net/podcast09/rss_20856.xml"
  no-render
  fields="title, description"
/>
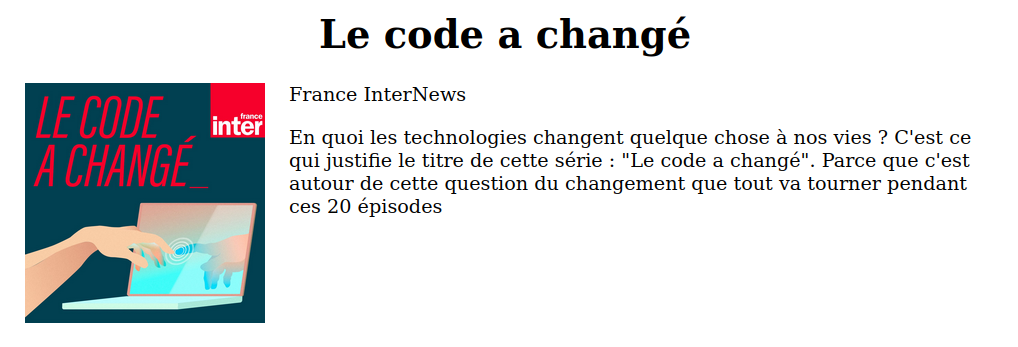
fields take an ordered list of field names (found in the data source) and make the component to display only those fields in the provided order.
We can also use a widget to specify how each field must be shown :
<solid-display
  data-src="http://radiofrance-podcast.net/podcast09/rss_20856.xml"
  fields="title, description"
  widget-title="h1"
  no-render
/>
widget-[field] take a HTML tag name and make the component use it to display this field.

It starts to look better !
Any HTML element can be used as widget, but Startin’blox also provide built-in widgets to easily manage specific
cases. To display images from their url, use the solid-display-img widget :
<solid-display
  data-src="http://radiofrance-podcast.net/podcast09/rss_20856.xml"
  fields="title, image.url, description"
  widget-title="h1"
  widget-image.url="solid-display-img"
  no-render
/>
Fields can also be grouped in sets using brackets : each bracket opens or closes a group, and groups can be nested. The word before the opening bracket is the group name and can be used to have a specific widget to display this group.
<solid-display
  data-src="http://radiofrance-podcast.net/podcast09/rss_20856.xml"
  fields="title, image.url, meta(itunes:author, itunes:category.text), description"
  widget-title="h1"
  widget-image.url="solid-display-img"
  widget-meta="p"
  no-render
/>
Apply CSS to have your own look-and-feel
solid-display uses standard HTML to display the data, and that HTML can be styled with CSS.
<style>
  solid-display {
    max-width: 800px;
    display: block;
    margin: auto;
  }
  solid-display img {
    width: 200px;
    float: left;
    margin-right: 20px;
  }
</style>
You can also target specific field with an attribute selector because <solid-display> component adds a
name="[field]" attribute to the displayed data.
[name="itunes:category.text"]{
  display: inline-block;
  border: solid thin;
  padding: 0.2em 0.5em;
  margin: 0 1em;
  border-radius: 0.5em;
}
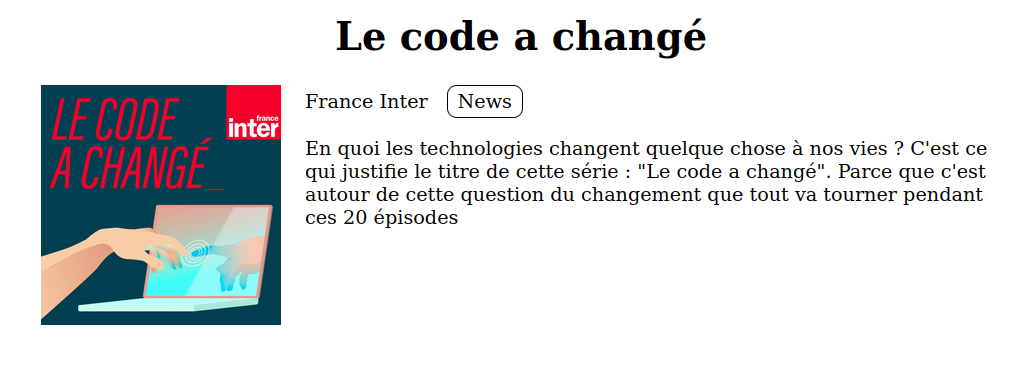
But sometimes it’s easier and cleaner to use classes. class-[field] tags let’s you specify a class name.
<style>
  .bordered {
    display: inline-block;
    border: solid thin;
    padding: 0.2em 0.5em;
    margin: 0 1em;
    border-radius: 0.5em;
  }
</style>

<solid-display
  data-src="http://radiofrance-podcast.net/podcast09/rss_20856.xml"
  fields="title, image.url, meta(itunes:author, itunes:category.text), description"
  widget-title="h1"
  widget-image.url="solid-display-img"
  widget-meta="p"
  class-itunes:category.text="bordered"
  no-render
/>
You can also use arbitrary text (enclosed by single quotes) in the fields list to display a text node :
<solid-display
  data-src="http://radiofrance-podcast.net/podcast09/rss_20856.xml"
  fields="title, image.url, meta('By: ', itunes:author, itunes:category.text), description"
  [...]
/>
Display nested list fields
Let’s now display the informations about podcast episodes. They are listed in the item field, and as soon as it’s
a list we have to tell the framework that it should be treated as multiple values.
This is achieved with the multiple-[field] attributes. This tag creates a nested <solid-display> for each entry in
item. multiple-[field]-fields attribute is used to control which nested fields are displayed for each item.
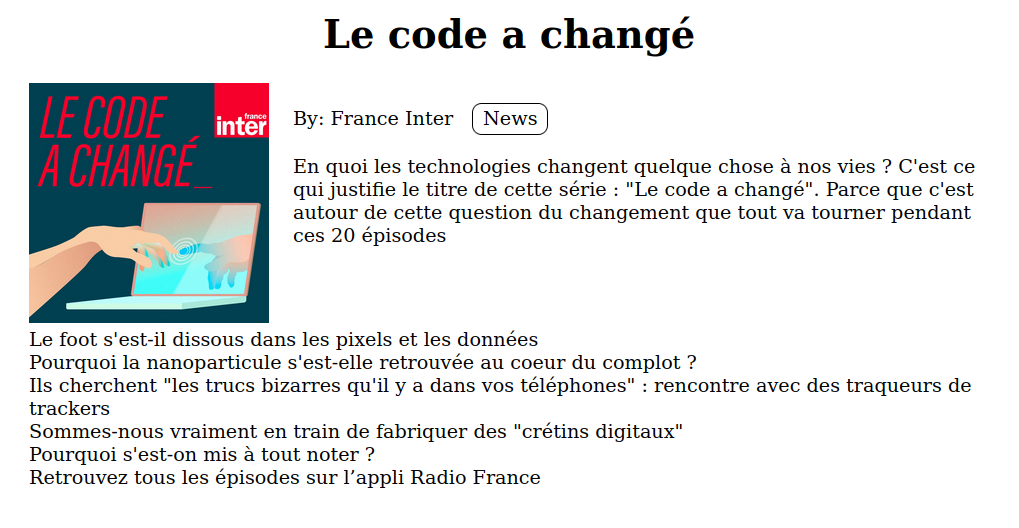
<solid-display
  data-src="http://radiofrance-podcast.net/podcast09/rss_20856.xml"
  fields="title, header(image.url, info( meta('By: ', itunes:author, itunes:category.text), description)), item"
  widget-title="h1"
  widget-image.url="solid-display-img"
  widget-meta="p"
  class-itunes:category.text="bordered"
  widget-header="header"
  multiple-item
  multiple-item-fields="title"
  no-render
/>
Custom template
To go further, we need to create our own widget template using the solid-widget tag. Let’s show other episode data:
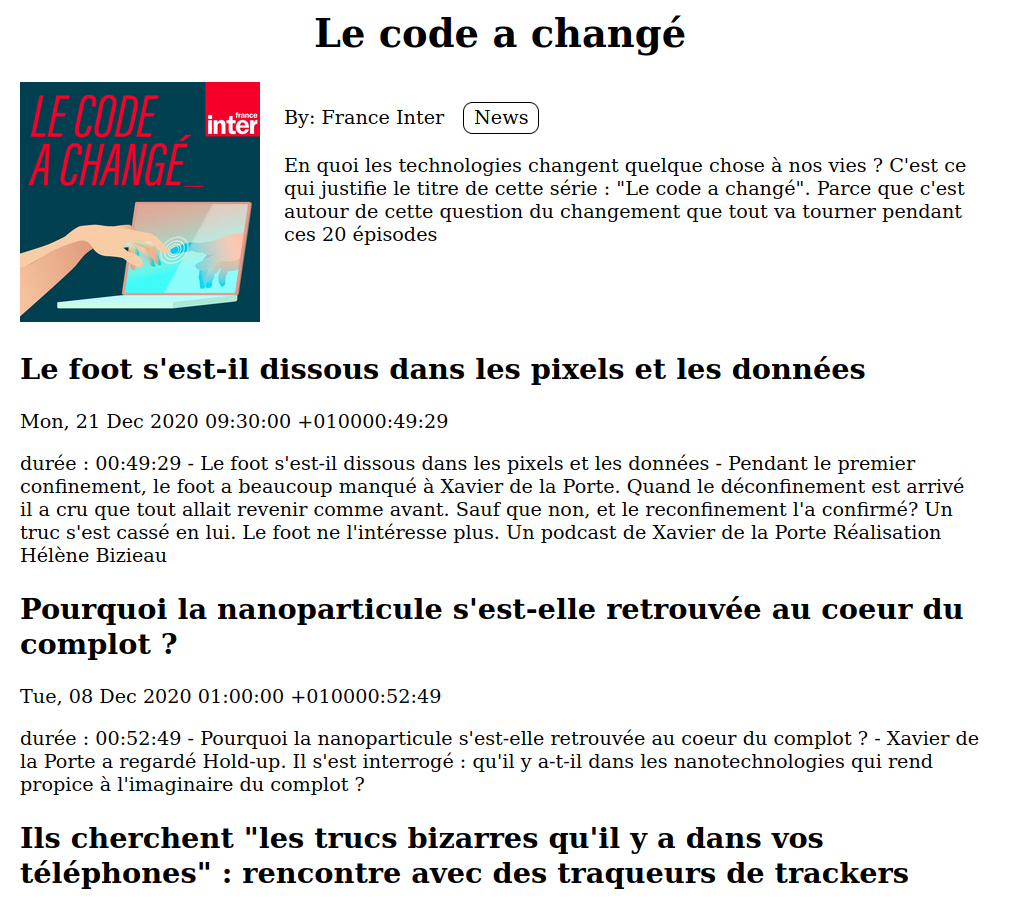
<solid-widget name="podcast-episode">
  <template>
    <solid-display
      data-src="${value}"
      fields="title, meta(pubDate, itunes:duration), description"
      widget-title="h2"
      widget-description="p"
    />
  </template>
</solid-widget>

<solid-display
  data-src="http://radiofrance-podcast.net/podcast09/rss_20856.xml"
  [...]
  multiple-item="podcast-episode"
  no render
/>
solid-widget tag must be used with template to avoid its content to be rendered during the first page display.
The code included in the template is then used by Startin’blox to render each item. And you can use here again all the
attributes we juste learned, such as fields and widget-[field].
Plug a bit of Javascript
When a custom widget template is used, it gets a javascript variable called value that contains the resource. It can be
displayed directly in the template using ${value} or you can apply some Javascript to it before. For example, here is how
to format the date using the browser locale settings :
<solid-widget name="format-date">
  <template>
    <time datetime="${value}">${new Date(value).toLocaleDateString(undefined, {weekday: 'long', year: 'numeric', month: 'long', day: 'numeric'})}</time>
  </template>
</solid-widget>
Now if I use widget-pubDate="format-date" in <solid-widget name="podcast-episode">, I get a nice formatted date :
And this template mechanism plays also nicely with other HTML5 standard tags, such as audio :
<solid-widget name="audio-player">
<template>
<audio src="${value}" controls/>
</template>
</solid-widget>
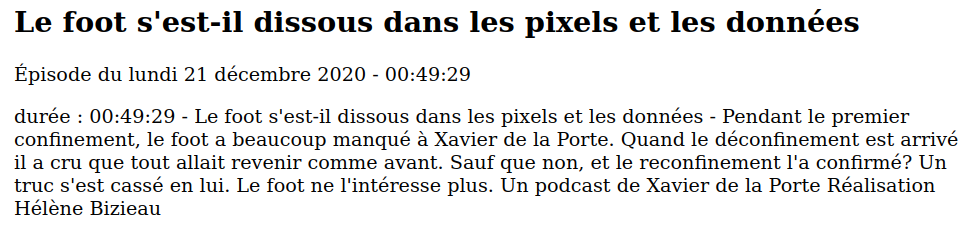
<solid-widget name="podcast-episode">
<template>
<solid-display
data-src="${value}"
fields="title, meta('Épisode du ', pubDate, ' - ', itunes:duration), description, enclosure.url"
widget-title="h2"
widget-description="p"
widget-pubDate="format-date"
widget-enclosure.url="audio-player"
/>
</template>
</solid-widget>

Conclusion
This short tutorial has showed how to display the data from a podcast RSS feed using startin’blox framework. You can now check this is working with other podcasts (provided that CORS headers are set on the server).
You can find the code on this repository.